Setting up a SIP Trunk between a Mitel 3300 and 3CX should be a simple task….
It’s been a while since I’ve written a blog post, so I thought it was about time I did one up. The primary purpose of this post is to explain how to configure a Mitel MiVoice 3300 System to SIP Trunk to a 3CX Software PBX. You can jump straight to the configuration details by clicking here, or you can start at the top and read the whole story.
It’s an interesting story that technically minded folk may or may not find interesting… so let’s go on with it.
Preamble
I’m currently looking in to replacing an ageing Mitel MiVoice system with a software solution (3CX). Unfortunately, we have a very specific use-case and consequently a tricky Chicken and Egg problem, due in part to our Mitel system also being integrated with a product called Benbria BlazeCast (now called Mitel Mass Notification). The BlazeCast system integrates to the Mitel MiVoice system over a SIP Trunk, and the BlazeCast System itself also receives SIP Registrations from little devices called CyberData Paging Amplifiers all over the campus.
The BlazeCast system is being used for a handful of things, including:
- Live Paging
- Bell Tones
- Evacuation Tones
- Lock-down Tones
and the actual topology of this layout looks something similar to this:
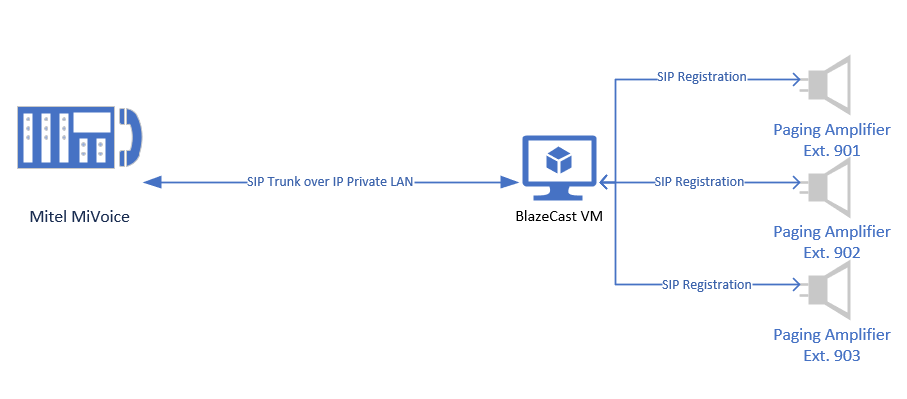
The reason we have the SIP Trunk between the Mitel system and the BlazeCast system is for the ability to trigger evacuations and lock-downs, and to also send bell tones to areas of the school where we don’t have speakers or don’t wish to use the speakers and would rather use VoIP Handsets instead. As such, with the move for us away from BlazeCast we need to be able to send bell tones to handsets on campus, and our new software (a product called Bell Commander) cannot page extensions like the BlazeCast product does, due in part to this being some type of proprietary feature in the Mitel system requiring Mitel parts and connectors to page.
And therein lay our chicken and egg problem. How do we replace BlazeCast with Bell Commander and/or Mitel with 3CX as well as retain the same functionality we had already across the entire campus?
If we replace BlazeCast with Bell Commander, we can’t page the Mitel phone handsets (where they are used instead of the CyberData Paging Amplifiers) due to software limitations. And if we replace Mitel with 3CX, we then have to replace every handset which then means bells will stop working in areas we are using handsets for bells. That would mean we would have to do a purchase, preconfigure, test, deploy and fine-tune in a holiday period or “big-bang” style approach (i.e. a weekend), and that is just something I don’t feel comfortable doing.
We also have some other functionality that I’m not going to go too far in to details here (for example, triggering lock-downs and evacuations from Mitel phone handsets, and Fire Panels triggering the BlazeCast notification through the PSTN Network in through the Mitel MiVoice system), because frankly it’s just a gross solution and the ultimate end-game here is that fire panels go back to just being a fire panel, and nothing more.
The Solution
So now that you know the lay of the land, you’re probably wondering what the solution is. Our key requirement was:
- Gradual replacement of Mitel Handsets with Yealink handsets attached to the 3CX Phone System running in AWS
But, this all depended on the ability to:
- Have bells working (as close as possible) the same as before
- Ability to trigger lock-downs & evacuations through authorised extensions only
- Replacing the CyberData Paging Amplifiers that are integrated with our Fire Panels with Barrix units and proper wiring and cabling (to reduce the background feedback from ABC Radio)
To achieve this, we had to have a SIP Trunk between the 3CX System and the Mitel MiVoice system, so that users from either side could call extensions on the other side without any resistance along the way. That was the hardest part of the whole configuration to get those two systems cooperating.
Once that was done, we could then re-configure the CyberData Paging Amplifiers to SIP Register to the 3CX Phone System until they gradually get replaced by Barrix units over time (which then moves to RTSP). As Mitel handsets were changed over to Yealink handsets, we would then add them in to the same paging group in 3CX as the CyberData Paging Amplifiers. That means that Bell Commander can call that page group to trigger the bells and other notifications.
All the while anything left on the old Mitel MiVoice system with BlazeCast would function exactly as it was, and services would slowly be transitioned over to the 3CX, Bell Commander and Barrix solution. Users left on the Mitel system would be able to call new extension ranges and new handsets on 3CX, and users on 3CX can call extensions left on Mitel. It’s a win-win for everyone!
How was it implemented?
As I said, the hardest part was getting the SIP Trunk operable so that Mitel extensions could call 3CX. Going the other way was easy. I’m going to outline with screenshots the configuration required to get this sorted.
3CX to Mitel
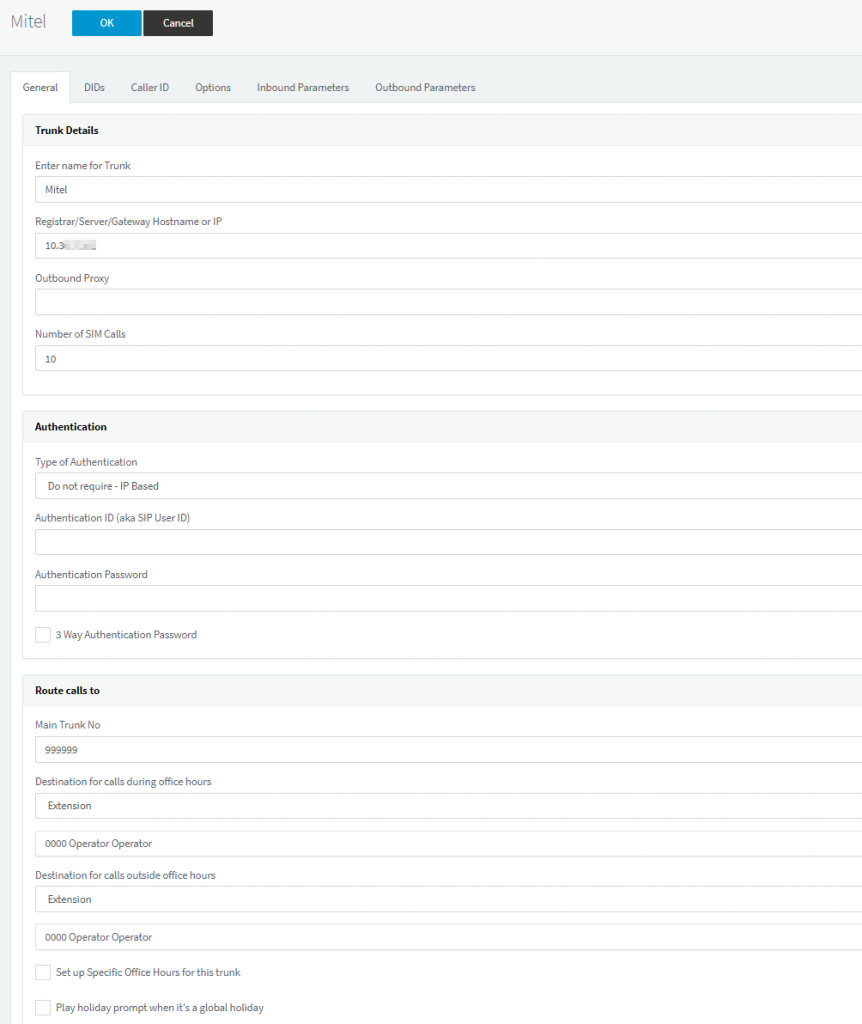
- Login to your 3CX Phone System, and navigate to SIP Trunks. Create a new trunk, and call it whatever you want – I called mine Mitel. Fill in the IP Address, and ensure you have Do Not Require – IP Based enabled.
- On Outbound Paramaters, I configured the following settings to ensure that the calling extension and calling name is displayed correctly on the Mitel handsets. Note that the outbound from user part is set to the caller ID in the extension properties.

- Configure the extension to have the correct outbound caller ID (we will override for PSTN calls on the outbound trunk)
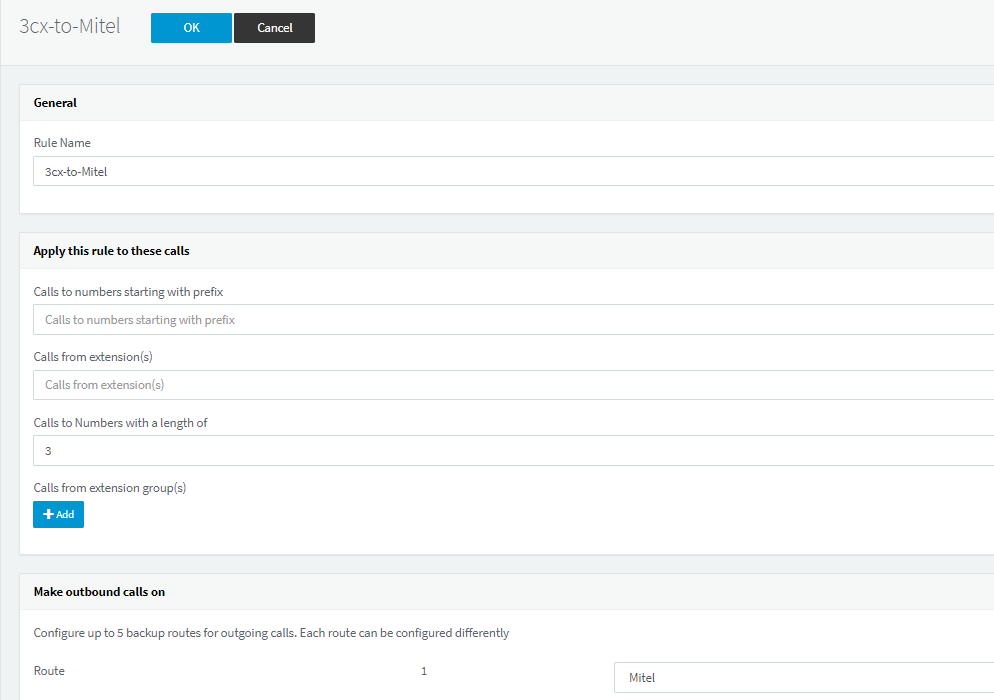
- Configure your Outbound route in 3CX to dump calls destined to whatever numbering scheme your Mitel extensions use on to the Mitel trunk. For us, our Mitel extensions are 3 digits.


That’s all the configuration required for the 3CX System. Now, for the Mitel side.
Mitel to 3CX
This is where it gets a little more complicated. The Mitel version we are using (and I’m not sure if this is the same in newer versions) relies heavily on a number/indexing system.
For example:
- Digits Dialled entry #2 which matches 9XXX goes to Route #7
- Check Route #7, it uses network element #2 with call options #3 and $someOtherSetting #8.
Confusing yes? I thought so too.
All of this configuration will be undertaken in the System Configuration Tool, and not Group Configuration.
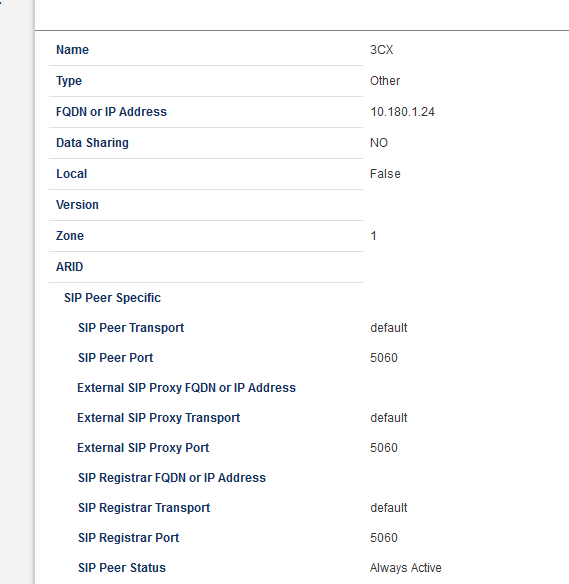
- Create a network elements in Mitel. You can find this under “Voice Network” -> “Network Elements”. Do not fill in any SIP Registrar details or Proxy details – we’re using IP Authentication for this.
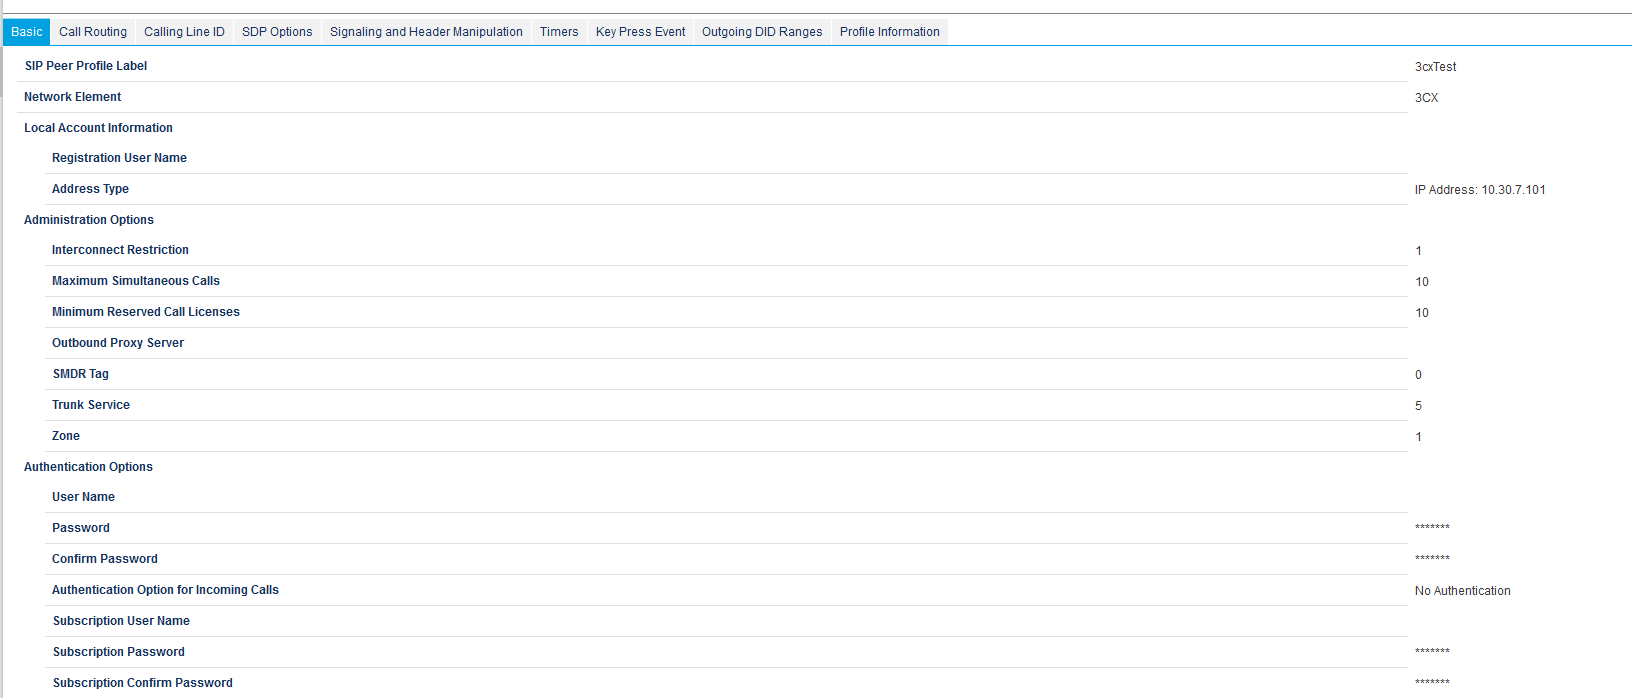
- Navigate to “Trunks” -> “SIP” -> “SIP Peer Profile”, and create a Peer Profile. Again, we don’t want to fill in any registration details as we are doing IP Authentication, but you will want to set the maximum calls to adhere to your Mitel licensing, as well as Interconnect Restrictions, Trunk Service, and Zone. I’ll be honest – I copied those settings from the BlazeCast trunk because I didn’t set them up, and I’m not really sure exactly what they do (remember, I said it’s this index numbering configuration, right?)
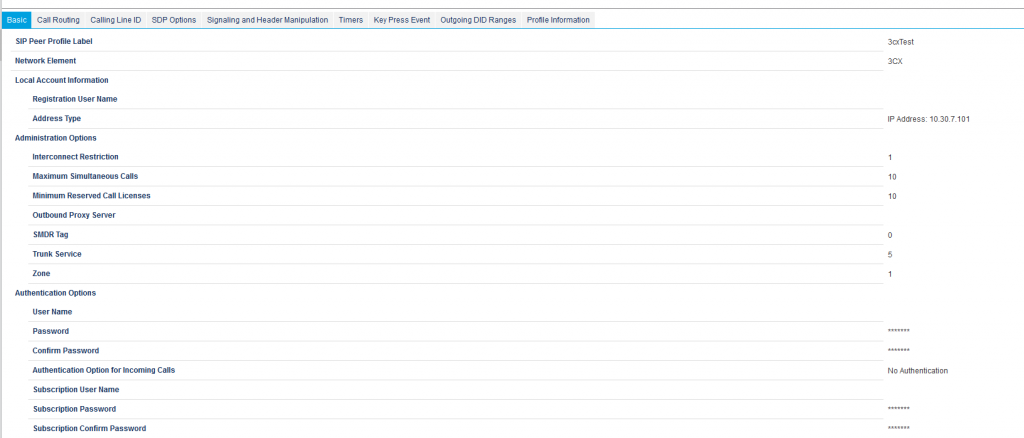
- The only other setting I changed from default on this was under “Signalling and Header Manipulation” to “E.164: Enable sending +”. That seemed to help the 3CX System handle inbound calls.
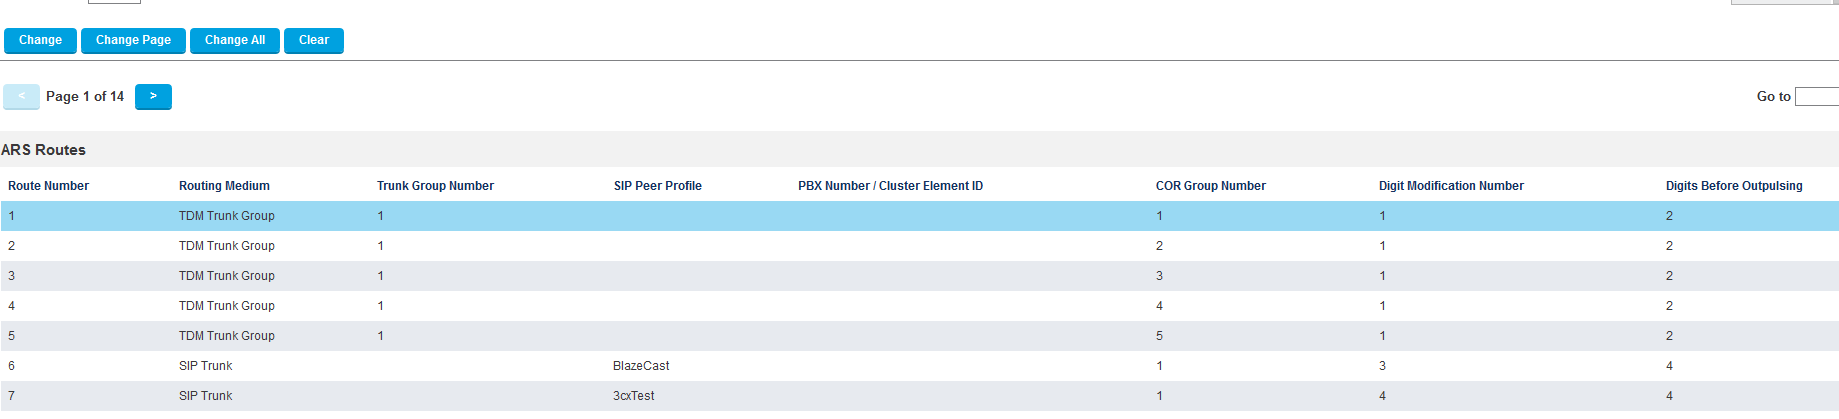
- Jump in to “Call Routing” -> “Automatic Route Selection (ARS)” -> ARS Routes, and configure a new Route to dump traffic on to the SIP Peer. In my case, it’s Route Entry #7. I also configured it for no digit modifications (based off of Digit Modification Number 1), Digits Before Outpulsing to 4 (we have 4-digit extensions on 3CX).
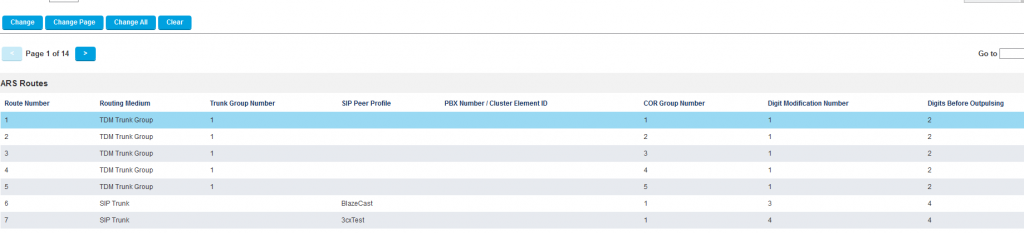
- Head across to the “ARS Digits Dialed” section, and then create your route table entries for your 3CX Extensions. In our case, I’ve added “4XXX” as the extensions we use begin with 4. You will see I also have some other test numbers in there.

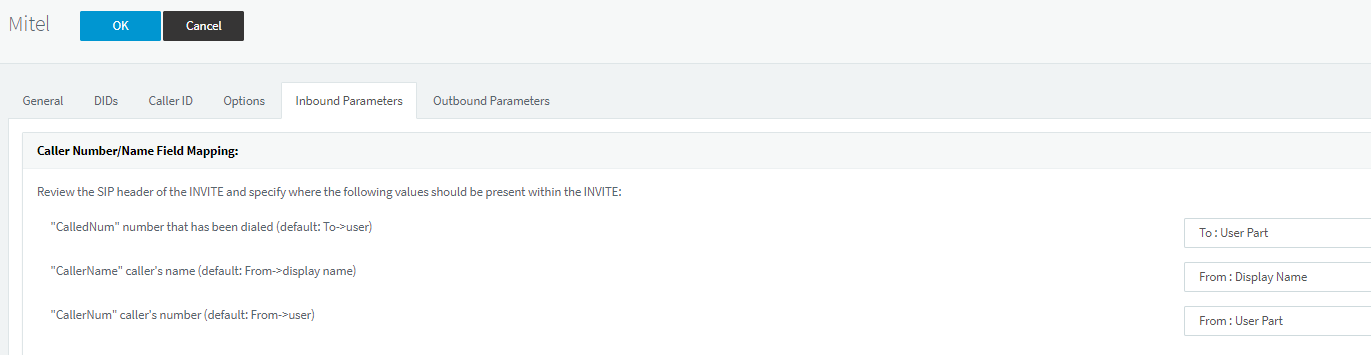
- Head across back to the 3CX Interface, and configure the following on Inbound properties on the Mitel 3CX Trunk. This will ensure that the correct names and extensions are displayed on calls received from Mitel in to 3CX.


There is still one more item to configure – but I’m going to explain it in the next section, as opposed to including it in these instructions.
DID Configuration
In a perfect world, we would be able to use the Mitel as a slave connecting to a 3CX Master Bridge. I tried making this work, but whatever information the Mitel system was trying to authenticate to 3CX with as a slave of the Master bridge just wasn’t going to cut it. I was met with constant authorisation issues – and it was mildly related to, I believe, a discussion I found on the 3CX Forums around the Mitel device needing the extension (Bridge ID) in the Registration username and then a username in the Authentication user field. I obviously tried setting the same information (Bridge ID) in both of these fields, but I was unable to get it to work.
As such, I had to resort to the SIP Trunk solution. The downside to this is that for every 3CX extension you want to be callable from Mitel, you need to configure a DID Entry for it and route it to the appropriate 3CX extension. This sucks, but it’s a workaround that provides the required functionality. This is why we add the + in Step 3 above, as it lets us match the following in DID rules on 3CX:
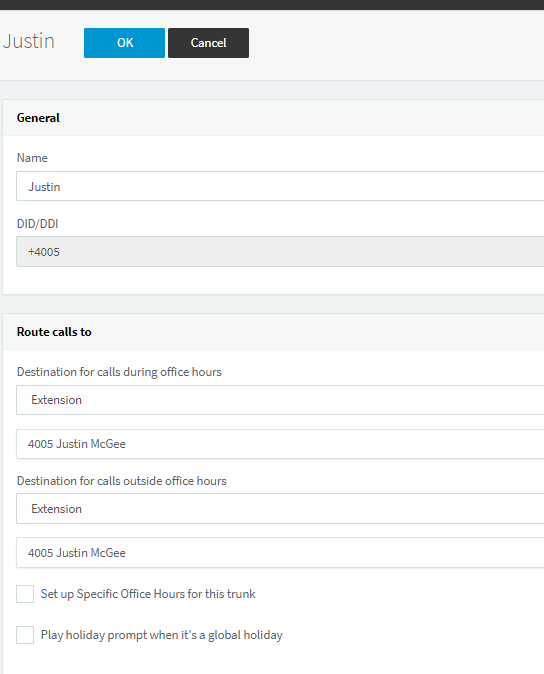
Without this enabled, calls to the 3CX System will end up dumped on whatever the default landing extension is for that SIP Trunk. For us, it’s the Operator. You may wish to adjust this to a real person so that in the event an extension gets missed, it actually comes to a real person for transferring.
Lessons Learned
We haven’t completely finished this implementation yet, but I wanted to write this article particularly for the information for others on how to configure the Mitel and 3CX SIP Integration. We’re going to be using the 3CX System in the IT Department for a while, just to test it out and make sure it works well.
Prior to getting to this stage, I spent days playing around with various settings and combinations, packet tracing, investigating and talking to people and reading the 3CX Forums. When it comes to VoIP, this isn’t my forte – so perhaps someone with more experience in VoIP could have worked this all out quicker than I did (especially if they knew Mitel), but part of the reason I’m moving away from the Mitel system is the over-complication and complexity that it adds to the environment (look at all those numbers we have to assign all over the place to action things, i.e. route tables, route plans, trunk numbers, digit modification numbers, etc).
With that said, I’ve never touched a Mitel phone system until playing with this setup so I felt like I learnt a lot from that, and that would have delayed my progress significantly. I still don’t think it’s as easy as the 3CX Solution though, and that’s why I’m pushing forward with the 3CX Solution.
Hopefully someone finds this guide useful!
That is a nice one.